Transforming Old Coin Collections into Stunning Honeycomb Wall Art: A DIY Guide
For many of us, a jar of old coins is more than just spare change; it is a tangible connection to history, travel, and personal memory. However, these collections often sit forgotten in drawers or cluttered on shelves, their aesthetic potential unrealized. What if you could transform this dormant collection into a striking piece of wall decoration that serves as a conversation starter in your home or office? The solution lies in the elegant simplicity of honeycomb structures. By combining numismatic treasures with modern laser-cutting technology, you can create a bespoke art piece that is both economical and visually captivating.
This article explores the process of creating honeycomb coin displays, detailing the appearance of the honeycomb cells, the versatility of the design, and the practical steps to bring this project to life. Whether you are a seasoned crafter or a beginner looking for a meaningful weekend project, this guide provides the clarity and context needed to succeed.
The Aesthetic Appeal: Why Honeycomb and Coins?
The choice of a honeycomb structure for displaying coins is not arbitrary. Hexagons are nature’s most efficient shape, offering structural stability and visual harmony. When applied to interior design, a honeycomb pattern creates a sense of order and rhythm that is pleasing to the eye. But beyond geometry, there is a symbolic resonance. Just as bees work together to build a hive, each coin in your collection represents a moment in time, a place visited, or a milestone achieved. Arranging them in a interconnected hexagonal grid symbolizes the interconnectedness of your experiences.
The visual contrast is equally compelling. Imagine the warm, organic grain of plywood framing the metallic sheen of aged copper, silver, or bronze. The honeycomb cells act as individual stages, spotlighting each coin while contributing to a larger, cohesive mosaic. This method allows for a detail of the appearance that is both rustic and modern. The rigid lines of the laser-cut wood soften the irregular shapes and varying sizes of old coins, creating a balanced composition that feels intentional and curated rather than chaotic.
Understanding the Structure
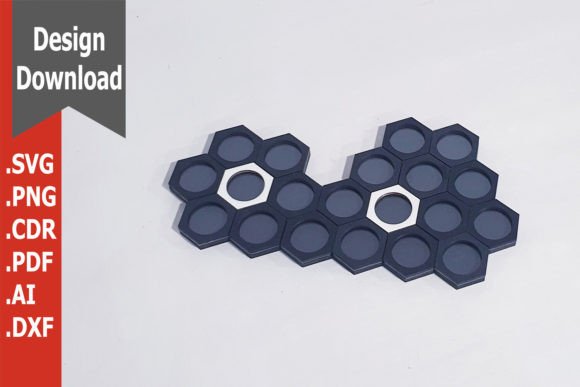
The core of this project is the modular honeycomb unit. Each hexagon is designed to hold a single coin or a small cluster of smaller denominations. Because the honeycomb is made one by one, you have complete creative freedom. You are not limited to a pre-defined rectangular frame. Instead, you can assemble the desired shape directly on your wall. This modularity means you can create a sprawling cluster that follows the contour of a staircase, a compact centerpiece above a mantel, or an abstract shape that mirrors your personal style.
The open-back design of typical laser-cut honeycombs ensures that the coins remain the focal point. Light can pass through the gaps, creating subtle shadows that add depth and dimension to the wall. This interplay of light and shadow is crucial for making the artwork feel alive, changing subtly throughout the day as natural light shifts across the room.
Practical Relevance: From Digital File to Physical Art
One of the most significant advantages of this project is its accessibility through digital fabrication. In the past, creating such intricate wooden lattices would require hours of manual cutting and sanding, demanding a high level of woodworking skill. Today, the process is streamlined through laser cutting. This technology democratizes custom design, allowing anyone with access to a local makerspace or online cutting service to produce professional-quality components.
The workflow is straightforward and user-friendly. All necessary design files are archived and available for immediate download. These are not static images but dynamic vector files, which means they are scalable to any size without losing resolution. This scalability is vital for SEO and user experience, as it allows customers to adapt the design to their specific space constraints without needing a designer’s help.
File Formats and Compatibility
To ensure broad compatibility with various laser cutters and software preferences, the project files are provided in multiple industry-standard formats:
- CDR: Ideal for users of CorelDRAW, a popular vector graphics editor.
- AI: Compatible with Adobe Illustrator, the industry standard for professional design.
- PDF: A universal format that preserves vector data, easy to view and print.
- DXF: Widely used in CAD (Computer-Aided Design) and compatible with most laser cutting machines.
- SVG: Perfect for web-based design tools and simpler cutting software.
Having access to these DIGITAL FILES means you are not locked into a single vendor or machine. You can download the file, modify the design layout to suit your requirements, and you are done with the preparation phase. This flexibility empowers users to tweak cell sizes if they have particularly large commemorative coins or adjust the overall dimensions to fit a narrow hallway.
Material Selection and Assembly
The choice of material plays a pivotal role in the final appearance and durability of your wall art. The project is designed to be economical and easy to assemble, making it suitable for mass production or individual DIY efforts. We recommend using 3mm plywood for the main structure. Plywood offers a beautiful natural edge when laser-cut, revealing the layered texture of the wood veneers, which adds a rustic charm. It is also lightweight, making it easy to mount on walls without heavy-duty anchors.
For a more contemporary or translucent look, 2mm organic glass (acrylic) is an excellent alternative. Acrylic allows for a sleek, modern aesthetic and can be tinted in various colors. It is particularly effective if you want to backlight the display, creating a glowing effect that highlights the coins from behind. However, for traditional coin collections, wood remains the preferred choice due to its warmth and ability to complement the metallic tones of the currency.
Step-by-Step Customization
- Download and Modify: Choose your preferred file format and open it in your design software. Adjust the scale if necessary to match the size of your coins.
- Cutting: Send the file to your laser cutter. Ensure the settings are optimized for 3mm plywood or 2mm acrylic to achieve clean, burn-free edges.
- Finishing: After cutting, you can paint in any color or leave the material natural. Staining the wood can enhance the grain, while painting allows you to match your interior decor. You might choose a dark walnut stain for a vintage look or a crisp white paint for a Scandinavian minimalist vibe.
- Decoration: Feel free to decorate with additional elements. Small LED lights can be woven through the back, or tiny plants can be interspersed between the coins for a biophilic design touch.
- Assembly: Glue the honeycomb units together or mount them individually on the wall. Use a level to ensure alignment, then secure each coin in its designated cell using a small dab of museum wax or clear adhesive.
Economic and Creative Benefits
Beyond its aesthetic value, this project is highly economical. Laser cutting minimizes material waste, and the use of standard plywood sheets keeps costs low. For entrepreneurs or educators, this makes the project ideal for mass production. Schools can use it as a history project, where students research the origins of their coins and assemble a class hive. Small businesses can offer customized versions as unique corporate gifts or retail products.
Furthermore, the modular nature of the design encourages creativity. You are not bound by a fixed template. You can expand the collection over time, adding new hexagons as you acquire new coins. This scalability ensures that the artwork grows with you, reflecting your ongoing journey and interests. It transforms a static collection into a living, evolving display.
Conclusion
Creating wall decoration from old coin collections using honeycomb structures is a perfect blend of nostalgia and modern craftsmanship. It offers a practical solution for displaying cherished items while enhancing your living space with unique, personalized art. With accessible vector files, easy-to-source materials like 3mm plywood, and a straightforward assembly process, this project is within reach for anyone willing to explore their creative side.
By understanding the detail of the appearance and the functional benefits of the honeycomb design, you can move beyond simple storage to create a meaningful visual narrative. Whether you are a collector, a designer, or simply someone looking to repurpose old items, this approach offers a rewarding way to honor the past while decorating for the present. Download the files, gather your coins, and start building your own hive of memories today.